dlink DAP 1320 setup and install
The installation is one of the efficient processes in any range extender without which no user can utilize his extender to extend the main network. The setup process of a range extender should be done near the main router to allow the Wi-fi signals to assist in the connection process between your range extender and the router. As soon as you are done with the setup process you must find a spot for your range extender from where it can deliver the maximum level of performance.
Note: Users are recommended to perform the Dlink extender setup process through a wired connection. Though the wired connection is a time taking process but a reliable and suitable for the setup process.
Steps to set up and install the dlinkap.local 1320 range extender
- Before the setup process, note down the default Wireless settings from the Wi-fi configuration card that includes the default network name and Wi-fi password. The default Wireless settings will be used to create the connection for the first time between your range extender and the computer.
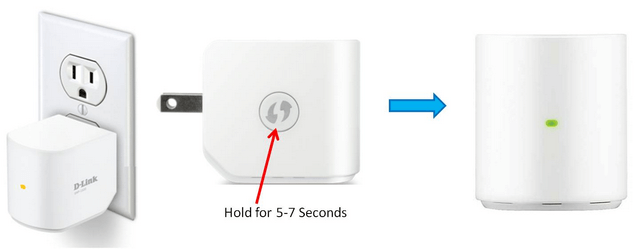
- To start the setup process, Connect your Dlink 1320 range extender directly to the power outlet. At first, the Power LED turns solid but when your range extender gets successfully turned on the LED flashes into the Amber
- Go to your computer and scan for the available Wi-fi network nearby from the Wi-fi tab residing at the title bar of your desktop screen.
- Type the default network name and mention the default password on their respective fields through the Wi-fi configuration card. Click on the Connect button to get connected to the Wi-fi network.
- Once you are connected to the Wi-Fi network, type www.dlinkap.local on the web address bar of the browser and hit the enter button. You also can type the LAN IP address of your Dlink Extender as the URL of the browser.
- Hit the enter tab and the setup wizard of the dlinkap.local appears on the screen. The setup wizard will take you to the remaining configuration process then click on the Next tab.
- Now manually select the network that you want to extend then you can click on the Wi-Fi.
- Go to the Wi-Fi list and locate the name of the network that you want to extend.
- Type down the Wi-Fi password of the network that you want to extend. You need to assign the Network name for the extended Wi-Fi network.
- You should also assign a Wi-Fi password to the Extended Network.
- Now set a login password for the Dlink Extender login window that will allow the user to bring changes in the Device settings and security mechanism of the device. The login password should be different from the router password as they both are used to access different settings of a Dlink Extender.
- Click on the Save button and the extender will start saving your changes. The moment you click on the Save button, your device will automatically restart.
Note: Once you are done with the Dlink extender setup process, you can configure other features like Access schedule, System time, firmware update, and Parental control feature to level up the performance of your device. You can also change the type of connection between your range extender and the router after the setup process. If you were connected to your extender through a wired connection you can swap to a wireless connection.
change the login password of the dlink DAP 1320 setup
The login password of the Dlink range extender can be changed anytime after the configuration process through the dlinkap.local window. You can also keep the default password as an actual password of the Dlink extender login window by skipping the last step of the setup process. The login password is used as a significant credential that allows a user to interact with the dlinkap.local window.
Steps to change the login password of the dlinkap.local 1320 range extender
- Open a browser on your computer or laptop to which the local network is connected.
- Go to the address bar of your browser and type dlinkap.local on the address bar of your browser. In case you encounter an error, type the LAN IP address of your extender as the URL of your browser. The LAN IP address of a Dlink 1320 range extender is 192.168.0.50
- Hit the enter button and you will be redirected to the Dlink Extender login window.
- Type down the login credentials within the respective login fields. Type “admin” as the default username and mention the password you typed earlier while logging into the dlinkap.local window. Both the credential fields are case-sensitive.
- Click on the login button and the web setup page of dlinkap.local appears on your screen.
- From the main navigation panel, go to the Management tab then select the Admin option.
- As soon as you click on the Admin option, the page of the Admin tab appears on the screen.
- Scroll down to the Admin Password option and remove the current password then type down the password you want to keep as the login password for the Dlink extender login window.
- Repeat the login password in the Confirm Password field.
- Click the Save option to save the configuration you made then click on the Reboot now option to allow the changes to take effect on the dlinkap.local window.
Note: While assigning the login password make sure to hold the shift key where want to mention an uppercase letter and release the shift key where you want to mention a lowercase letter. Both the login credential fields of the Dlink extender login window are case-sensitive, any fault while typing the password may bring failure in accessing the dlinkap.local management window.